Difference between revisions of "Screen"
m |
(→Queries) |
||
| (19 intermediate revisions by the same user not shown) | |||
| Line 1: | Line 1: | ||
The screen block is used to build web screens. To configure it (i.e. change rights, rotation, resolution, etc...), use the [[Screen Configurator]] item. | The screen block is used to build web screens. To configure it (i.e. change rights, rotation, resolution, etc...), use the [[Screen Configurator]] item. | ||
| − | =Recipe= | + | {{#widget:AdSense}} |
| + | |||
| + | ==Recipe== | ||
[[File:Screen.png]] | [[File:Screen.png]] | ||
| − | =How to build= | + | The item on the bottom line is a [[Backlight]]. |
| + | |||
| + | ==How to build== | ||
The screen block alone is useless. In order to build a working screen, you need to place screen blocks in a plane configuration (width x height x 1 multiblock structure). The minimum size is 2x2 (this can't be changed), and the default maximum size is 16x16 (this can be changed in the configuration file). Once the structure is built, simply right-click on the side where you want the screen to be <strong>with an empty hand</strong>. Horizontal screens are supported since WebDisplays 1.12.2. | The screen block alone is useless. In order to build a working screen, you need to place screen blocks in a plane configuration (width x height x 1 multiblock structure). The minimum size is 2x2 (this can't be changed), and the default maximum size is 16x16 (this can be changed in the configuration file). Once the structure is built, simply right-click on the side where you want the screen to be <strong>with an empty hand</strong>. Horizontal screens are supported since WebDisplays 1.12.2. | ||
| − | [[File:ValidScreen.png]] | + | [[File:ValidScreen.png|427px|center|A valid screen structure]] |
| − | =Changing the URL= | + | ==Interacting with the screen== |
| + | ===Changing the URL=== | ||
To change the screen URL, sneak and right-click (again, with an empty hand) the screen. | To change the screen URL, sneak and right-click (again, with an empty hand) the screen. | ||
| − | [[File:SetURLUI.png]] | + | [[File:SetURLUI.png|427px|center|The GUI used to change the URL]] |
If you forget the protocol, WebDisplays will automatically add "http://" at the beginning of your URL. The "YT" button is used to turn regular YouTube URLs to embed (full-screen) YouTube URLs. It will unlock if a YouTube URL is detected. Clicking it while holding shift will add the auto-play argument to the URL so that the embedded movie starts immediately once the page is loaded. | If you forget the protocol, WebDisplays will automatically add "http://" at the beginning of your URL. The "YT" button is used to turn regular YouTube URLs to embed (full-screen) YouTube URLs. It will unlock if a YouTube URL is detected. Clicking it while holding shift will add the auto-play argument to the URL so that the embedded movie starts immediately once the page is loaded. | ||
| + | |||
| + | Please note that some videos (like music videos) do not allow embedding, so this doesn't always work. | ||
| + | |||
| + | ===Clicking=== | ||
| + | There are two ways to click on the screen. The first one consists in right-clicking the screen with an empty hand. The second requires the [[Laser Sensor]] upgrade and the [[Laser Pointer]] item. How to use them is described in detail on their respective pages. | ||
| + | |||
| + | All these methods will perform <strong>left-clicks</strong> on the web browser. Currently, there is no way to right-click. | ||
| + | |||
| + | ===Typing=== | ||
| + | You can type using the [[Keyboard]] peripheral. After placing it, use the [[Linking Tool]] to bind it to the screen, and then right-click on the keyboard to start typing. To exit the keyboard, press Escape. | ||
| + | |||
| + | ==Permissions & ownership== | ||
| + | Since WebDisplays 1.12.2, every screen has an owner. Depending on the screen's configuration, players (except the owner of course) have restricted access to that screen. The only way to change the screen owner is by either breaking the screen and re-creating it, or by using the [[Ownership Thief]] item (which is only available via the /give command). | ||
| + | |||
| + | The owner does not only have all rights on his screen, but is also responsible for sending some JavaScript queries to the server. Thus, if he is disconnected or outside the screen view range, some JavaScript functionalities will be unavailable (for instance, all JS queries provided by the [[Redstone Output Port]] will be ineffective). | ||
| + | |||
| + | ==Multiplayer synchronization== | ||
| + | In Multiplayer, screens <strong>ARE NOT</strong> fully synchronized. Every player has a separate web browser instance, and may not see web pages the same way. Most of the time web pages do not change depending on who's watching them; in this case Screens look synchronized. However, the YouTube homepage, for instance, suggests videos based on your video history (among other things). So if a player clicks on a video on the YouTube homepage, everyone may see a different video depending on what YouTube suggested (that's why you should always copy/paste the URL if you want to display a specific video). | ||
| + | |||
| + | ==Extensibility== | ||
| + | WebDisplays screens feature two extension mechanisms: peripherals and upgrades. | ||
| + | |||
| + | ===Peripherals=== | ||
| + | Peripherals are blocks which can be linked to screens using the [[Linking Tool]]. Currently, WebDisplays features 5 peripherals: | ||
| + | * The [[Keyboard]] | ||
| + | * The [[ComputerCraft Interface]], disabled for the moment since ComputerCraft is not up to date | ||
| + | * The [[OpenComputers Interface]], which allows OpenComputers to interact with screens | ||
| + | * The [[Remote Controller]], which enable the user to change the browser URL remotely | ||
| + | * The [[Redstone Controller]], which changes the URL depending on a redstone signal | ||
| + | |||
| + | ===Upgrades=== | ||
| + | Upgrades are items that provides additionnal features to the screen. Simply right-click on the screen with an upgrade in hand to install it. To remove an upgrade, you'll have to use a [[Screen Configurator]]. | ||
| + | Right now, WebDisplays offers 4 upgrades: | ||
| + | * The [[Laser Sensor]], required to use the [[Laser Pointer]] | ||
| + | * The [[Redstone Input Port]] enables web pages to read the redstone levels for each screen blocks. | ||
| + | * The [[Redstone Output Port]] enables web pages to make some screen blocks emit redstone signals. | ||
| + | * The [[GPS Module]] adds a JavaScript function to fetch the X, Y and Z location of the screen. | ||
| + | |||
| + | ==Special URLs== | ||
| + | ===Player pages=== | ||
| + | Because of the new features allowing JavaScript to interact with redstone, players can upload small web pages to the server, making them available to other players. This is done using the [[Server]] block. This functionality can be disabled through the configuration file. | ||
| + | |||
| + | These pages can be accesses through special URLs that look like this: <code>wd://player-uuid/page.html</code> | ||
| + | |||
| + | ===Internal pages=== | ||
| + | WebDisplays comes with 3 internal pages: | ||
| + | * <code>mod://webdisplays/main.html</code> The default homepage | ||
| + | * <code>mod://webdisplays/io.html</code> Is a page that demoes the [[Redstone Input Port]] and the [[Redstone Output Port]] capabilities | ||
| + | * <code>mod://webdisplays/blacklisted.html</code> Is displayed if a blacklisted page shows up | ||
| + | |||
| + | ==JavaScript== | ||
| + | Web pages may interact with screens using MCEF queries. These can be invoked using the following code: | ||
| + | <syntaxhighlight lang="javascript" line='line'> | ||
| + | window.mcefQuery({request: "WebDisplays_{QueryName}", | ||
| + | persistent: true, | ||
| + | onSuccess: function(response) {}, | ||
| + | onFailure: function(errCode, errMsg) {} | ||
| + | }); | ||
| + | </syntaxhighlight> | ||
| + | |||
| + | Some queries require parameters to work. Parameters are passed in the query name between parenthesis. For instance, the <code>GetRedstoneAt</code> requires x and y parameters, so the request name should look like this: <code>WebDisplays_GetRedstoneAt(0, 0)</code>. Please note that the query names are case insensitive. | ||
| + | |||
| + | WebDisplays will return data in the JSON format through the <code>success</code> callback. | ||
| + | |||
| + | You can also use the [https://github.com/montoyo/webdisplays/blob/master/src/main/resources/assets/webdisplays/html/wdlib.js wdlib.js] file, which is completely free and features easy-to-use functions to interact with WebDisplays. | ||
| + | |||
| + | ===Queries=== | ||
| + | This is a list of queries which do not require any extension to work: | ||
| + | {| class="wikitable" | ||
| + | |+ | ||
| + | !Query name | ||
| + | !Arguments | ||
| + | !Return value | ||
| + | !Comment | ||
| + | |- | ||
| + | |GetSize||None||<code>{"x":int,"y":int}</code>|| | ||
| + | |- | ||
| + | |GetUpgrades||None||<code>{"upgrades":[string]}</code>||The name of each upgrades can be found on their wiki page | ||
| + | |- | ||
| + | |IsOwner||None||<code>{"isOwner":bool}</code>||Returns true if the client is the screen owner | ||
| + | |- | ||
| + | |GetRotation||None||<code>{"rotation":int}</code>||Multiply by 90 to get the and in degrees | ||
| + | |- | ||
| + | |GetSide||None||<code>{"side":int}</code>||0 to 5 (inclusive), B-T-N-S-W-E order | ||
| + | |} | ||
| + | |||
| + | ===Callbacks=== | ||
| + | This is a list of functions called by WebDisplays | ||
| + | * <code>webdisplaysUpgradesChanged()</code> will be called when an upgrade is installed or removed from the screen | ||
| + | |||
| + | ==Domain blacklist== | ||
| + | You can black-list some domain names through the WebDisplays configuration file. Be aware that this system is subdomain-sensitive, so if you blacklist example.com, www.example.com will still be accessible. | ||
Latest revision as of 21:10, 22 April 2018
The screen block is used to build web screens. To configure it (i.e. change rights, rotation, resolution, etc...), use the Screen Configurator item.
Contents
Recipe
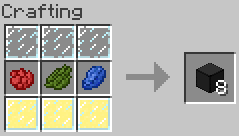
The item on the bottom line is a Backlight.
How to build
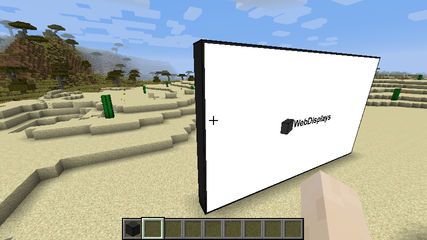
The screen block alone is useless. In order to build a working screen, you need to place screen blocks in a plane configuration (width x height x 1 multiblock structure). The minimum size is 2x2 (this can't be changed), and the default maximum size is 16x16 (this can be changed in the configuration file). Once the structure is built, simply right-click on the side where you want the screen to be with an empty hand. Horizontal screens are supported since WebDisplays 1.12.2.
Interacting with the screen
Changing the URL
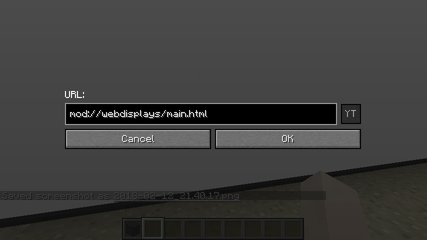
To change the screen URL, sneak and right-click (again, with an empty hand) the screen.
If you forget the protocol, WebDisplays will automatically add "http://" at the beginning of your URL. The "YT" button is used to turn regular YouTube URLs to embed (full-screen) YouTube URLs. It will unlock if a YouTube URL is detected. Clicking it while holding shift will add the auto-play argument to the URL so that the embedded movie starts immediately once the page is loaded.
Please note that some videos (like music videos) do not allow embedding, so this doesn't always work.
Clicking
There are two ways to click on the screen. The first one consists in right-clicking the screen with an empty hand. The second requires the Laser Sensor upgrade and the Laser Pointer item. How to use them is described in detail on their respective pages.
All these methods will perform left-clicks on the web browser. Currently, there is no way to right-click.
Typing
You can type using the Keyboard peripheral. After placing it, use the Linking Tool to bind it to the screen, and then right-click on the keyboard to start typing. To exit the keyboard, press Escape.
Permissions & ownership
Since WebDisplays 1.12.2, every screen has an owner. Depending on the screen's configuration, players (except the owner of course) have restricted access to that screen. The only way to change the screen owner is by either breaking the screen and re-creating it, or by using the Ownership Thief item (which is only available via the /give command).
The owner does not only have all rights on his screen, but is also responsible for sending some JavaScript queries to the server. Thus, if he is disconnected or outside the screen view range, some JavaScript functionalities will be unavailable (for instance, all JS queries provided by the Redstone Output Port will be ineffective).
Multiplayer synchronization
In Multiplayer, screens ARE NOT fully synchronized. Every player has a separate web browser instance, and may not see web pages the same way. Most of the time web pages do not change depending on who's watching them; in this case Screens look synchronized. However, the YouTube homepage, for instance, suggests videos based on your video history (among other things). So if a player clicks on a video on the YouTube homepage, everyone may see a different video depending on what YouTube suggested (that's why you should always copy/paste the URL if you want to display a specific video).
Extensibility
WebDisplays screens feature two extension mechanisms: peripherals and upgrades.
Peripherals
Peripherals are blocks which can be linked to screens using the Linking Tool. Currently, WebDisplays features 5 peripherals:
- The Keyboard
- The ComputerCraft Interface, disabled for the moment since ComputerCraft is not up to date
- The OpenComputers Interface, which allows OpenComputers to interact with screens
- The Remote Controller, which enable the user to change the browser URL remotely
- The Redstone Controller, which changes the URL depending on a redstone signal
Upgrades
Upgrades are items that provides additionnal features to the screen. Simply right-click on the screen with an upgrade in hand to install it. To remove an upgrade, you'll have to use a Screen Configurator. Right now, WebDisplays offers 4 upgrades:
- The Laser Sensor, required to use the Laser Pointer
- The Redstone Input Port enables web pages to read the redstone levels for each screen blocks.
- The Redstone Output Port enables web pages to make some screen blocks emit redstone signals.
- The GPS Module adds a JavaScript function to fetch the X, Y and Z location of the screen.
Special URLs
Player pages
Because of the new features allowing JavaScript to interact with redstone, players can upload small web pages to the server, making them available to other players. This is done using the Server block. This functionality can be disabled through the configuration file.
These pages can be accesses through special URLs that look like this: wd://player-uuid/page.html
Internal pages
WebDisplays comes with 3 internal pages:
-
mod://webdisplays/main.htmlThe default homepage -
mod://webdisplays/io.htmlIs a page that demoes the Redstone Input Port and the Redstone Output Port capabilities -
mod://webdisplays/blacklisted.htmlIs displayed if a blacklisted page shows up
JavaScript
Web pages may interact with screens using MCEF queries. These can be invoked using the following code:
1 window.mcefQuery({request: "WebDisplays_{QueryName}",
2 	persistent: true,
3 	onSuccess: function(response) {},
4 	onFailure: function(errCode, errMsg) {}
5 });
Some queries require parameters to work. Parameters are passed in the query name between parenthesis. For instance, the GetRedstoneAt requires x and y parameters, so the request name should look like this: WebDisplays_GetRedstoneAt(0, 0). Please note that the query names are case insensitive.
WebDisplays will return data in the JSON format through the success callback.
You can also use the wdlib.js file, which is completely free and features easy-to-use functions to interact with WebDisplays.
Queries
This is a list of queries which do not require any extension to work:
| Query name | Arguments | Return value | Comment |
|---|---|---|---|
| GetSize | None | {"x":int,"y":int} |
|
| GetUpgrades | None | {"upgrades":[string]} |
The name of each upgrades can be found on their wiki page |
| IsOwner | None | {"isOwner":bool} |
Returns true if the client is the screen owner |
| GetRotation | None | {"rotation":int} |
Multiply by 90 to get the and in degrees |
| GetSide | None | {"side":int} |
0 to 5 (inclusive), B-T-N-S-W-E order |
Callbacks
This is a list of functions called by WebDisplays
-
webdisplaysUpgradesChanged()will be called when an upgrade is installed or removed from the screen
Domain blacklist
You can black-list some domain names through the WebDisplays configuration file. Be aware that this system is subdomain-sensitive, so if you blacklist example.com, www.example.com will still be accessible.


