Difference between revisions of "Laser Sensor"
(Created page with "The Laser Sensor is an upgrade which allows the use of a Laser Pointer as a "remote mouse". ==Recipe== File:Lasersensor.png ==How to use== Just l...") |
|||
| (One intermediate revision by the same user not shown) | |||
| Line 2: | Line 2: | ||
==Recipe== | ==Recipe== | ||
| − | [[File: | + | [[File:Upgrade laser.png]] |
| + | |||
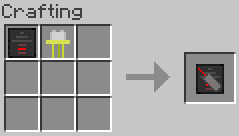
| + | The item on the left is a [[Blank Upgrade]] and the item on the right is a [[650nm Laser Diode]]. | ||
==How to use== | ==How to use== | ||
| Line 8: | Line 10: | ||
Note that you will need the "Link & upgrade" permission to install the upgrade, as well as the "Click & type" permission to use the [[Laser Pointer]]. | Note that you will need the "Link & upgrade" permission to install the upgrade, as well as the "Click & type" permission to use the [[Laser Pointer]]. | ||
| + | |||
| + | ==JavaScript== | ||
| + | The upgrade name returned by <code>GetUpgrades</code> is <code>webdisplays:lasermouse</code>. | ||
Latest revision as of 02:28, 14 February 2018
The Laser Sensor is an upgrade which allows the use of a Laser Pointer as a "remote mouse".
Recipe
The item on the left is a Blank Upgrade and the item on the right is a 650nm Laser Diode.
How to use
Just like any other upgrade, right-click on a screen with the upgrade in your main hand to install it. Then, aim at the screen and right-click with a Laser Pointer in your hand.
Note that you will need the "Link & upgrade" permission to install the upgrade, as well as the "Click & type" permission to use the Laser Pointer.
JavaScript
The upgrade name returned by GetUpgrades is webdisplays:lasermouse.
